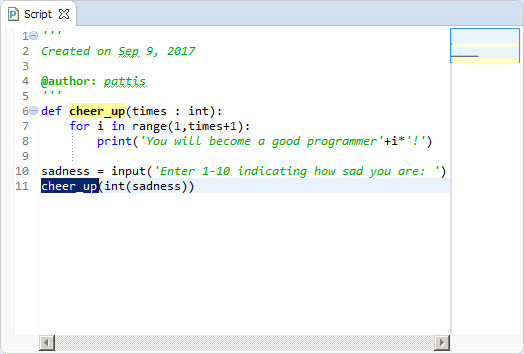
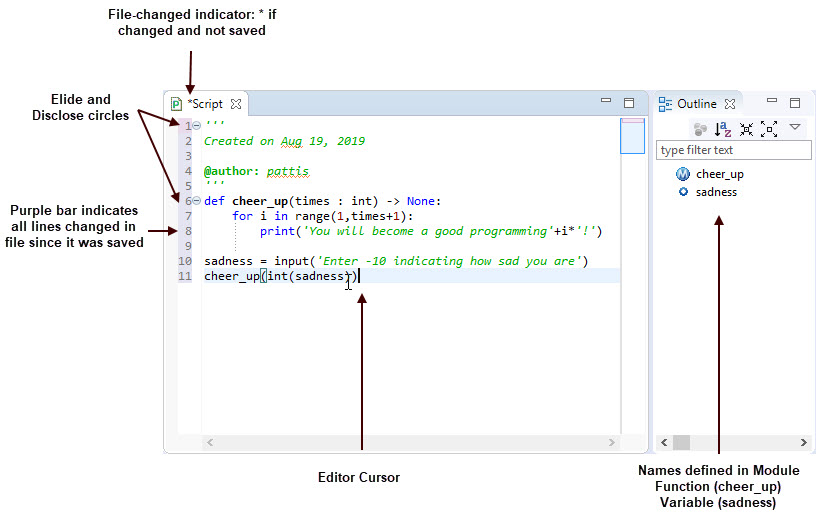
Note the annotations indicating
- The file being edited has changed (see the file-change indicator).
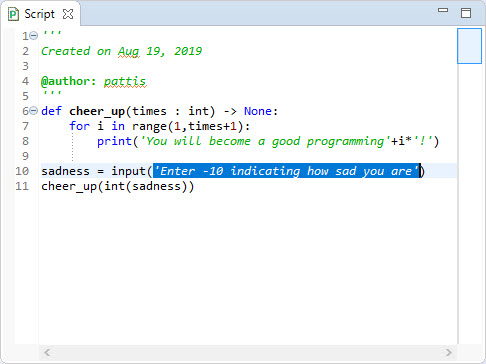
- Disclosure circles appear for multi-line code: here a multi-line string and
a multi-line function/method definition, both fully disclosed.
By clicking, we can elide these to a single line or disclose their full
contents.
- Which lines have changed (see the purple coloring of the line numbers);
if the change is one or more deleted lines, a small horizontal line
appears where the lines used to be).
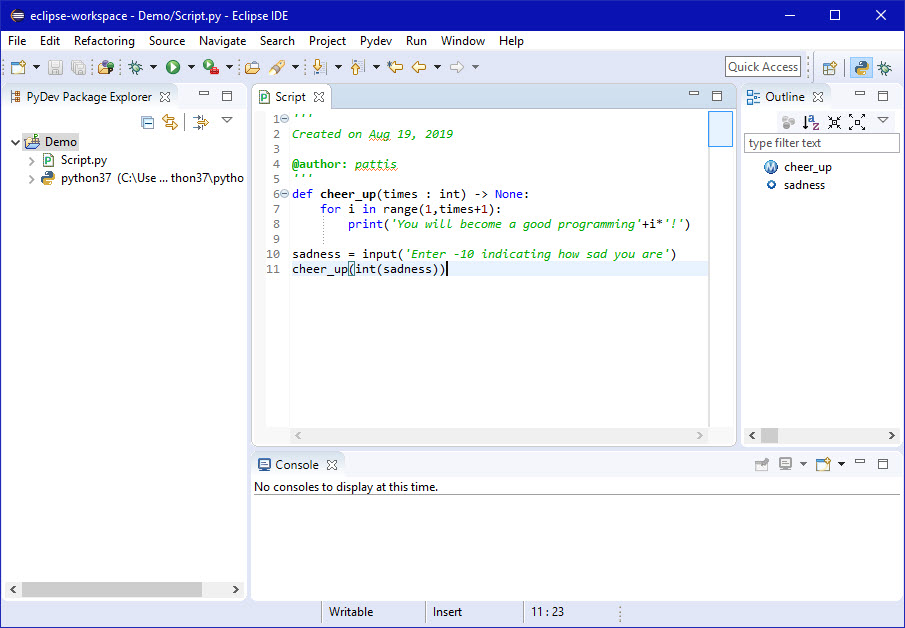
- As the Editor view changes, the contents of the Outline view
changes automatically: here we have defined a cheer_up as a
function/method (see big M in frontof it) and sadness as a
variable.
To save the changed contents of an Editor view to its file, right-click
in the view and select Save; note that this option will not be
selectable if the file has not changed: if the file-change indicator is
absent.
Another way to issues this command is just by typing ctrl/s on the
keyboard when this tab is selected.
After issuing this command, the file is updated to contain all the information
currently in the tab for this module.
If instead we right-clicked the view and selected the Revert File
command, the view would would be restored to the file's contents when it was
last saved.
So, use Save and Revert File carefully: we will be using
Save much more than Revert File, and we can always select the
Edit | Undo Typing command (or just press ctrl/z to undo any
changes (and selecting this command multiple times undoes multiple changes;
if we go too far with ctrl/z, we can press ctrl/y to redo
undone commands).
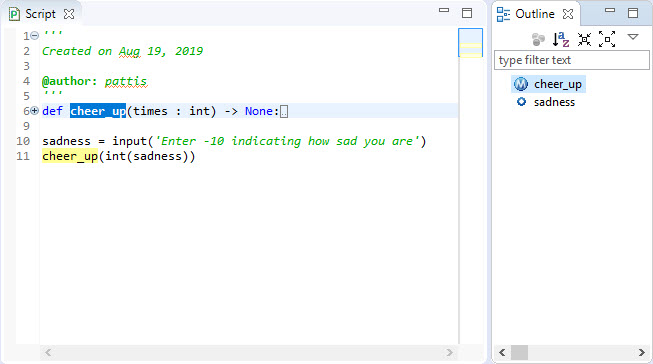
If we issued the Save command in the window above, it would be updated
and appear as follows.
Note the disappearance of the asterisk (the file-changed indicator) and the
purple change bars.
Often, if we forget to save a file, and perform some othe operation in Eclipse
-such as running a script- Eclipse will ask us whether to save the file(s)
first.
In the Eclipse editor, whenever we type an opening delimiter -e.g., a
parenthesis, brace, bracket, or quotation mark- the editor automatically
supplies the matching closing delimeter, and then repositions the cursor
between the two so, that we can easily type the delimited entity.
Related to this behavior, if the cursor is followed by a closing delimiter, and
we type that same closing delimiter, the Editor just moves the cursor past it.
This editor behavior can be a little confusing, until we get used to it; but
for writing programs, this is useful behavior.
Likewise, whenever we double-click directly after an opening delimiter (except
for the quotation mark), the editor automatically highlights all information
between that delimiter and its matching closing delimiter.
Below I double-clicked just to the right of the first opening parenthesis on
line 10.
This operation -matching opening and closing delimiters- is often useful when
we are debugging (removing errors from) our programs: errors related to
correctly matching opening to closing delimiters.
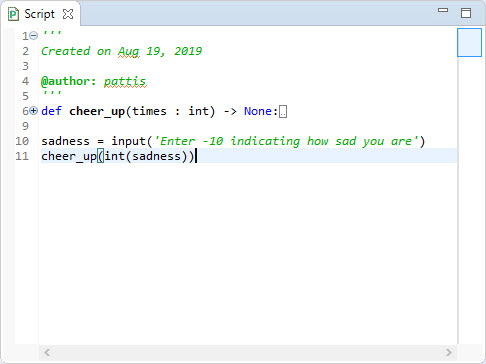
We can hide any mult-line code (here the top string and cheer_up
function/method) from the Editor view by clicking its disclosure
circle.
Generally throughout Eclipse clicking on a + means disclose the elided
information; clicking on a - means hide the disclosed information.
In the Editor view below, we have hidden the cheer_up function/method:
notice how it shows the header of the method, but not its body, instead
showing  .
With this mechanism we can temporarily hide the parts of our Python code that
we are not currently interested in seeing in detail, allowing us to see
more code in the tab that we are interested in seeing. .
With this mechanism we can temporarily hide the parts of our Python code that
we are not currently interested in seeing in detail, allowing us to see
more code in the tab that we are interested in seeing.
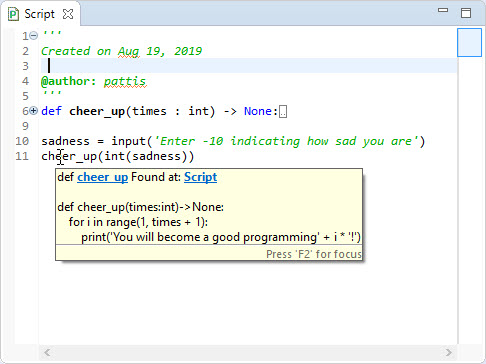
In fact, if we hover over a disclosure circle that is eliding information, the
cursor will change to a hand (not shown below) and Eclipse will temporarily
display the elided information in a yellow box, while keeping it elided in
the Editor view (so we can peek at it).

If we hover over a name in an Editor view, Eclipse shows us something
interesting about that name: its definition.
If we click on a name in the Editor view, Eclipse selects that name as a token
and shows us other places in that Editor window where this same name appears,
by putting the name in a yellow background.
Likewise, in complicated modules, with many names, we can use the Outline
view to rapidly examine selected names in the module.
By clicking an entry in the Outline view, Eclipse shows us where it was defined
in the Editor view (its defintion is outlined in blue) and where it is used
(outlined in yellow).
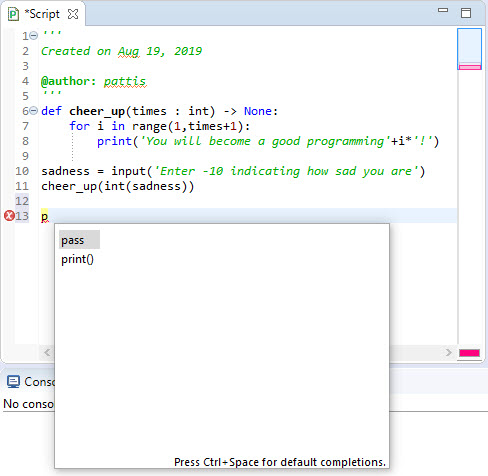
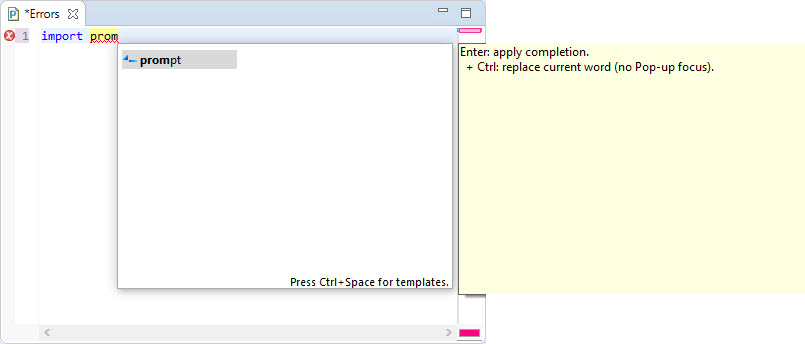
Finally, whenever we start typing a token, Eclipse displays possible
completions for that token based on Python keywords.
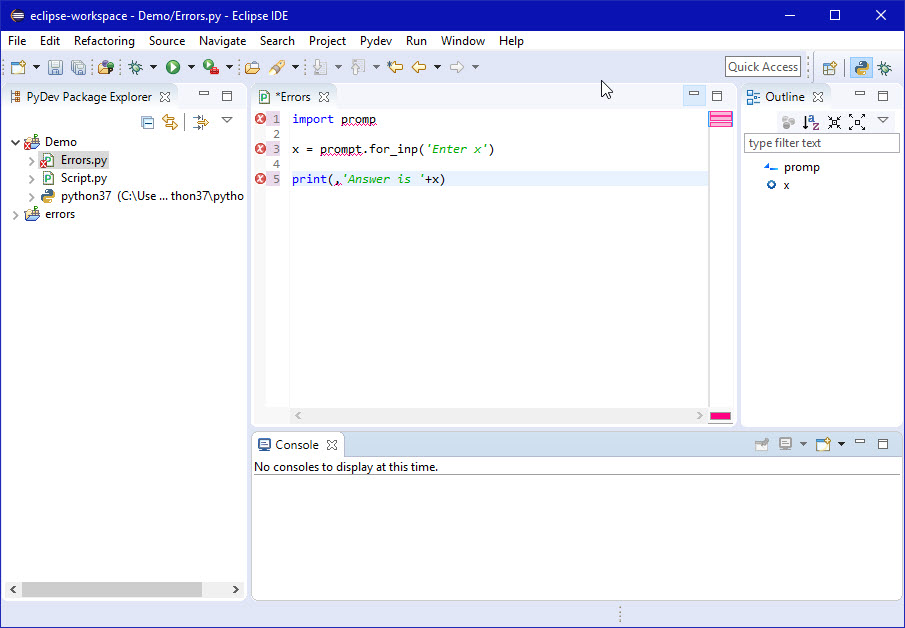
Until it recognizes a correct token, Eclipse marks the code with a syntax
error icon ( ), indicating an error
(as illustrated below).
We will soon learn how to find and fix Python syntax errors in Eclipse.
Note that because we typed a p, the * indicator once again prefaces
Script. ), indicating an error
(as illustrated below).
We will soon learn how to find and fix Python syntax errors in Eclipse.
Note that because we typed a p, the * indicator once again prefaces
Script.
We can continue typing the token, or double-click one of the keywords to have
Eclipse complete the token.
If we press ↵ Eclipse will complete the token with the highlighted
completion (and we can use the ↑ and ↓ keys to scroll through the
possible completions before using ↵ to make our selection).
Don't be distracted by this mechanism; it is probably best to just keep
typing your code and ignore the completions.
Pressing Shift/↵ tells Eclipse to ignore word complettion for this
word.
In addition if we press the ctrl/space command when Eclipse present us
with keyword completions, it will present us with other "useful" code that
might go here.
Below I have highlighted the pow selection, and Eclipse provides me with
information about it in yellow on the right.
I can scroll through or select one of these entries as described above.
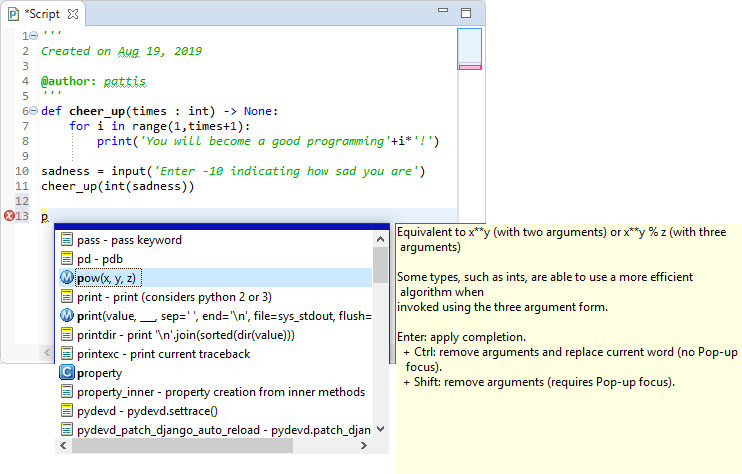
Again, it is probably best to ignore these other completions for now.
There is a delicate balance beetween what information you should supply and
what information Eclipse should provide.
Now it is time to go back and enter into Eclipse all the code illustrated in
this section, and reread and practice doing all the operations discussed.
Remember to type the code carefully, with letters in their correct case, proper
punctuation, and proper spacing.
Watch carefully what happens when you pres ↵ on lines that do or don't
end with a colon (and what the backspace key does on indented lines).
Once you are done entering this code, you can go to the next section and learn
about executing/runnning it.
|


 .
.
 .
.
 .
.
 .
.


 .
.
 (located on the toolbar
holding the Console view) and then click 6 PyDev Console as
illustrated below.
(located on the toolbar
holding the Console view) and then click 6 PyDev Console as
illustrated below.


 .
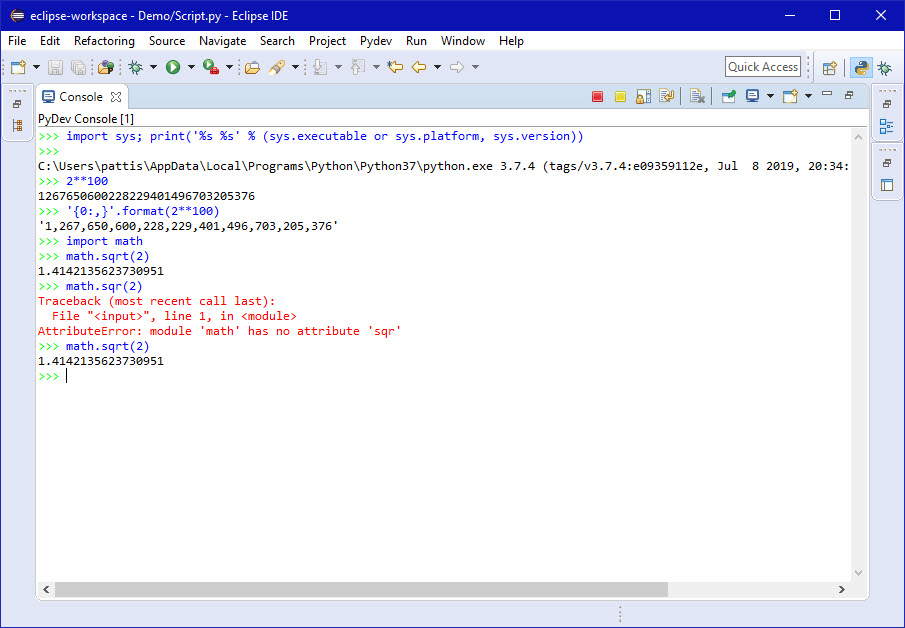
The result appears as follows (with the PyDev Package Explorer,
Editor, and Outline views minimized: the first on the left;
the second two on the right (Outline on top of Script).
.
The result appears as follows (with the PyDev Package Explorer,
Editor, and Outline views minimized: the first on the left;
the second two on the right (Outline on top of Script).
 .
.
 to see all active
Consoles:
at present, one run of the Demo.py script (numbered 1) and one
PyDev Console (numbered 2, with a circle to its left,
indcicating that it is the one we see in the Console view).
to see all active
Consoles:
at present, one run of the Demo.py script (numbered 1) and one
PyDev Console (numbered 2, with a circle to its left,
indcicating that it is the one we see in the Console view).

 ) on the main toolbar
for the PyDev perspective and then select PyDev Project, as
shown below.
) on the main toolbar
for the PyDev perspective and then select PyDev Project, as
shown below.


 ) and then hover over New
and select PyDev Module, as shown below.
) and then hover over New
and select PyDev Module, as shown below.


 .
.
 ).
If we minimize a window, we can restore it similarly
(
).
If we minimize a window, we can restore it similarly
( ).
We can also toggle between a midimized/restored and maximized view by
double-clicking its tab (the most useful operation of the bunch).
).
We can also toggle between a midimized/restored and maximized view by
double-clicking its tab (the most useful operation of the bunch).
 .
.
 .
.
 icon) and then select Show Line Numbers to toggle its "check".
We can use the same command to remove line numbers, by toggling its "check".
icon) and then select Show Line Numbers to toggle its "check".
We can use the same command to remove line numbers, by toggling its "check".

 .
.
 .
We assume here that there are no syntax or execution errors in our script (there
won't be if we typed it exactly as shown above): see the next section for
information on correcting syntax and execution errors.
.
We assume here that there are no syntax or execution errors in our script (there
won't be if we typed it exactly as shown above): see the next section for
information on correcting syntax and execution errors.


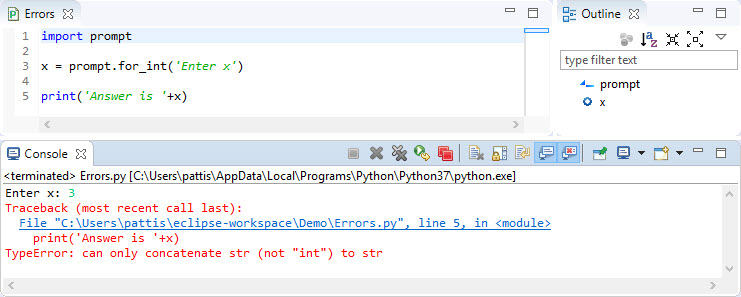
 ) next to any module that
contains one or more errors.
) next to any module that
contains one or more errors.


 ), which is shown in the menu above;
by doing so, Eclipse pops-up the following Delete Resources
confirmation window.
), which is shown in the menu above;
by doing so, Eclipse pops-up the following Delete Resources
confirmation window.


