| Introduction |
This "programming assignment" is designed to ensure that you know how to
use -at least in a cookbook way-
Eclipse (for editing, running, and debugging Java programs, after
installing course libraries/Jar files),
JUnit (and Driver programs, for testing and locating errors), and
Checkmate for submitting programs for grading.
You will start this programming assignment similarly to others this quarter.
You may want to print this document and carefully read it, marking any parts that contain important information (for review before you turn in the file); you might want to save the copy you marked-up. This is the first quarter that I am using this document, so please report any problems (even just typos) to me. I expect you to read this entire document and perform the operations it describes. |
| Download and Unzip |
Download (onto your desktop) and unzip the following
Eclipse Start Project Folder.
If you have any problems ask one of the staff for help.
Information about unzipping on labs machines is available
via the Handouts (General) link on the webpage;
there, click the Windows/ Operating System and
Eclipse IDE link.
Or, see the Unzipping Files link in the
Tutorial on the Windows Operating System and Eclipse IDE.
This document includes lots of useful information about using Windows,
Eclipse, and Checkmate.
The resulting unzipped folder has a deeply nested folder (via the folders edu, uci, ics, pattis, ics23, and finally collections) that contains just the two files LinearArrayQueue.java and TestQueue.java. These files will both be discussed in detail later in this assignment. |
| Start Eclipse, Create a Project, and Install the Libraries |
Next you need to start Eclipse and create a Java project using the
project folder you just downloaded as the existing source.
See the Start/Stop and Existing Sources links in the
Tutorial on the Windows Operating System and Eclipse IDE.
For uniformity, use the name Program0 for your project's name.
The project file that you create will show syntax/compilation errors, until
you correctly install the Jar libraries/files, discussed below.
For this programming assignment (and most of the others this quarter), you need to install the libraries contained in the introlib.jar, junit4-7.jar, and collections.jar files. Information about installing Jar libraries is available via the Online Resources link in the left-hand index of the course webpage; there, click the View: Using Jar Libraries in Eclipse link. Or, read this entire document by clicking Using Jar Libraries in Eclipse. Read the document just mentioned. It shows you how to install these three libraries correctly. Two (introlib.jar and junit-4.7.jar) must be installed using one method; the other (collections.jar) must be installed using another method. In the material below, I will assume that you have successfully installed all three of these libraries correctly, so do it now. The LinearArrayQueue.java filein this project contains almost correct code that implements the behavior of a queue. You will be implementing lots of (abstract) data types, like this one, during the quarter. A queue is a simple FIFO data type, adhering to the First-in First-out order property. Queues add values to their rear and remove values from their front, so these are the two "hot spots" that must be efficiently accessed in any data structures that implements a queue. We can implement queues efficiently by using either an array or linked list data structure. The queue implementation in this programming assignment, LinearArrayQueue, declares the required instance variables and needed methods using an array data structure. Using a linear array is conceptually simple to understand and program, but it has a slower-than-necessary remove operation (when compared with using a circular array data structure, which we will discuss later in lecture). When all the necessary libraries are installed, this class compiles and runs, but results in a few execution/run-time errors, which we will see via the Driver and the JUnit tests discussed below. |
| Run the Driver |
Each data type that we will discuss this quarter has a "driver" program that
allows us to "drive it": to call (test) each of its methods and observe the
results.
The Driver for queues is in the class named DriverForOrderedCollection,
which is the collections library.
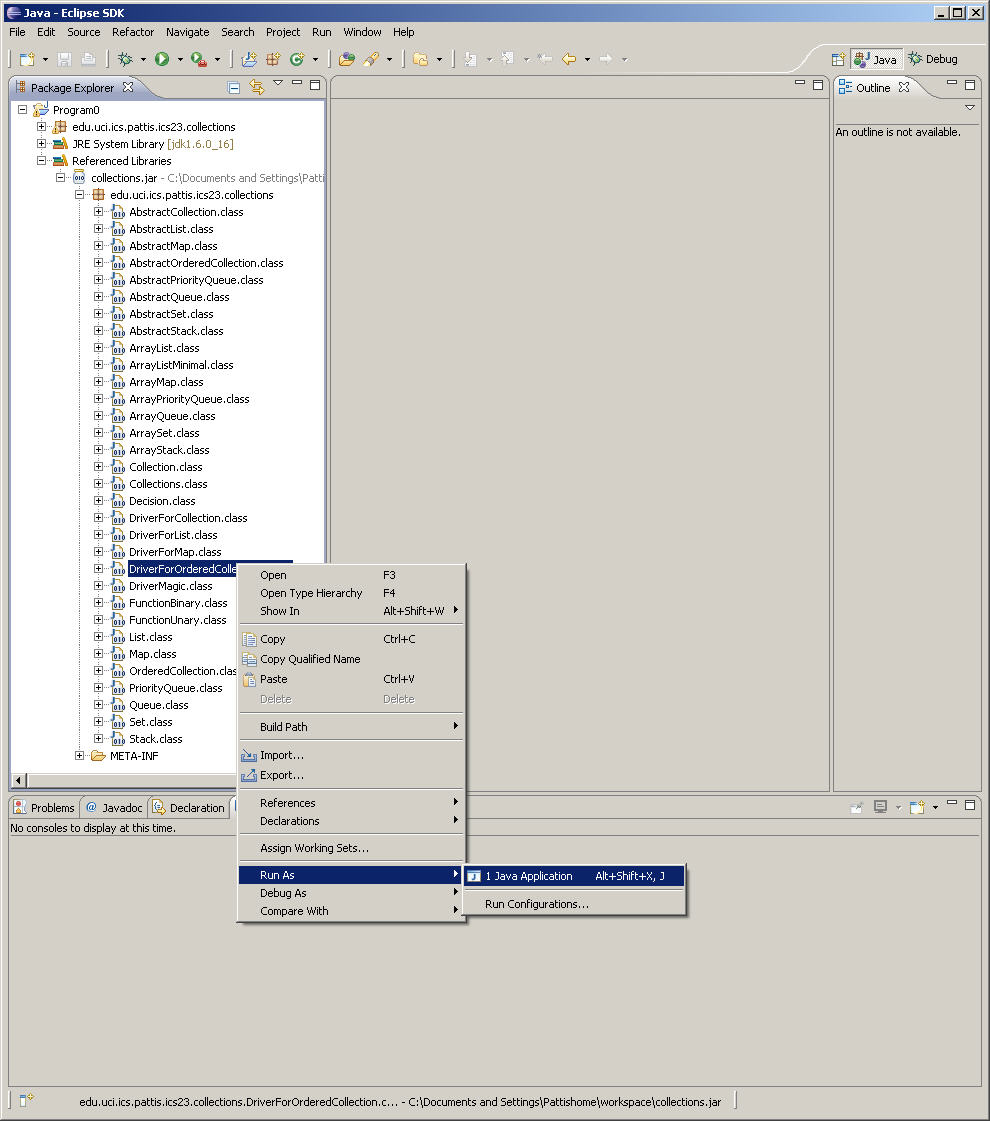
To run this Driver program, we must first find it:
|
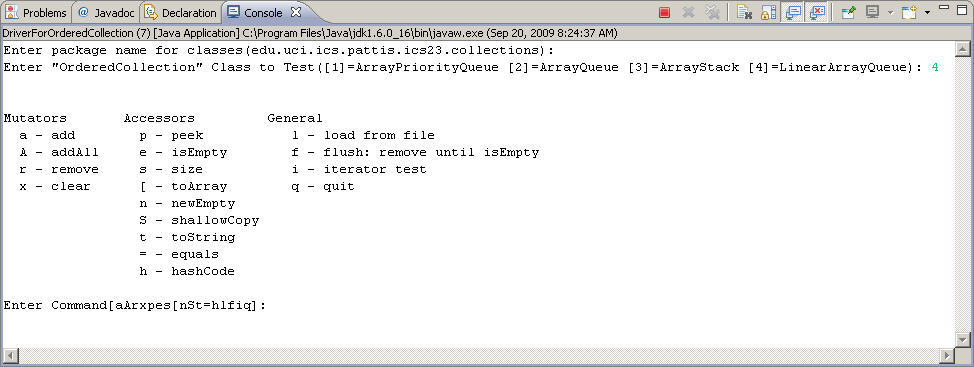
| The program should now start running in the Console tab at the bottom of Eclipse. Answer the first prompt by just pressing the Enter/Return key (it has the same effect as if you typed the default value that appears in the parentheses); then answer the second prompt by typing the number in brackets that precede LinearArrayQueue (which should be option 4). The console window will display the following menu of options that you can use to call/test each queue method. |
|
Note that this Driver tests a queue that stores String values.
You must enter a single letter to test any Mutator (Command) or Accessor
(Query) method.
Of special note is the t command, which test the toString method
by printing the value it returns.
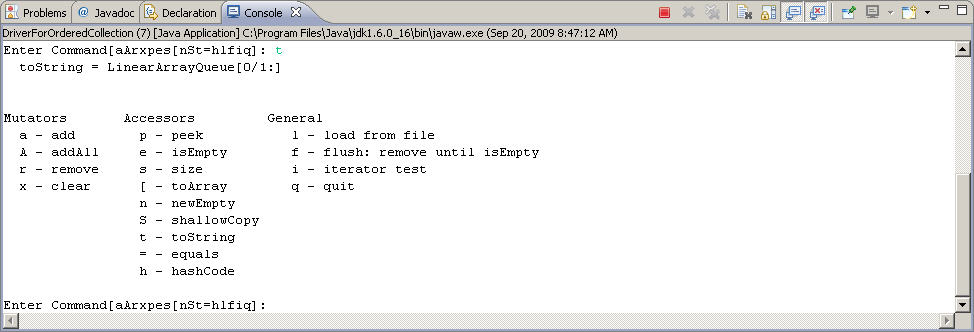
It prints a String that starts with the name of the class (here LinearArrayQueue) and its interesting state in brackets. First, it always shows two numbers separated by a slash: the first is the number of values in (the size of) the queue; the second is the length of the array storing the queue (which should always be at least as big as the size). If the size of the queue isn't zero, the toString method shows that many indexes in the array, illustrating the index and value of each. Then testing this queue implementation, the user can call toString to observe the effect of calling a mutator. Issue the t command and the Driver should print the following |
|
which describes a queue implemented
by this class.
It currently stores 0 values in an array whose length is 1 (the
array currently has the capacity to store just one value).
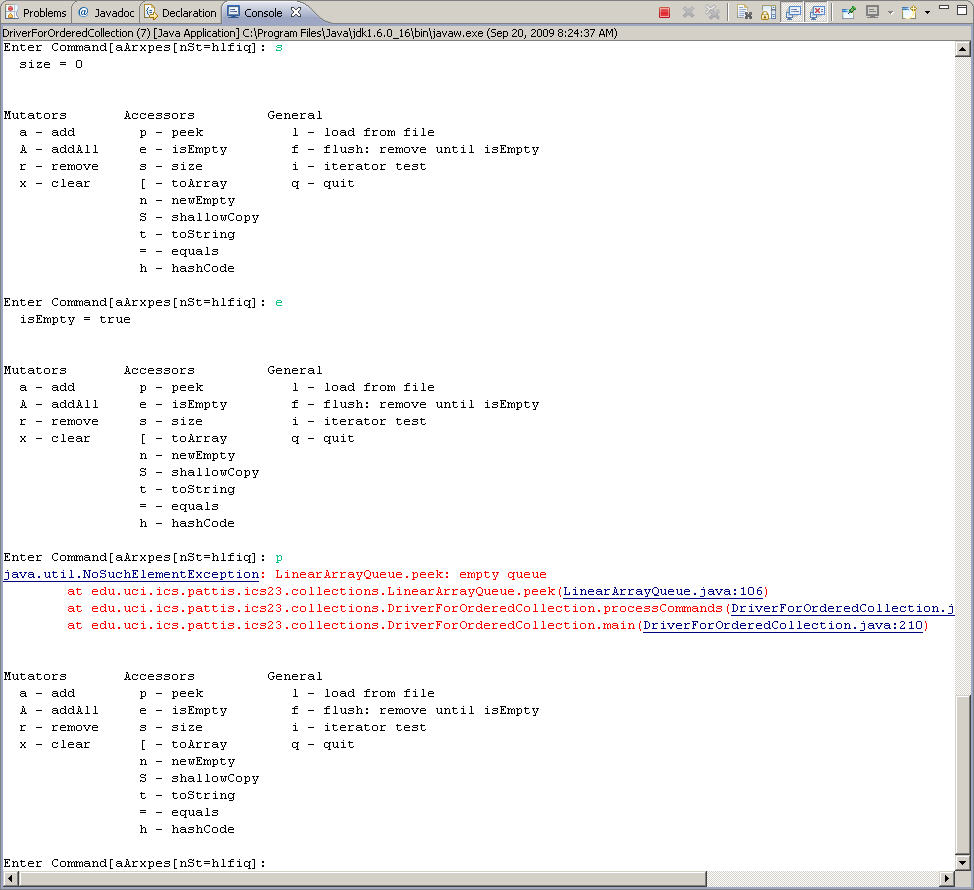
Then issue the s, e, and p commands to query the state of the object. The Driver should print the following |
|
The peek command, which returns the first value (the Driver prints this
value) in a queue cannot work correctly on an empty queue.
Notice what is printed instead: the thrown exception
(NoSuchElementException)
and the sequence of calls that led to it being thrown; if you click on the
link to LinearArrayQueue.java:106 Eclipse will load the file
containing this class and highlight the line that threw the exception.
Thus, the Driver just ignores this command and we can continue driving the
LinearArrayQueue class.
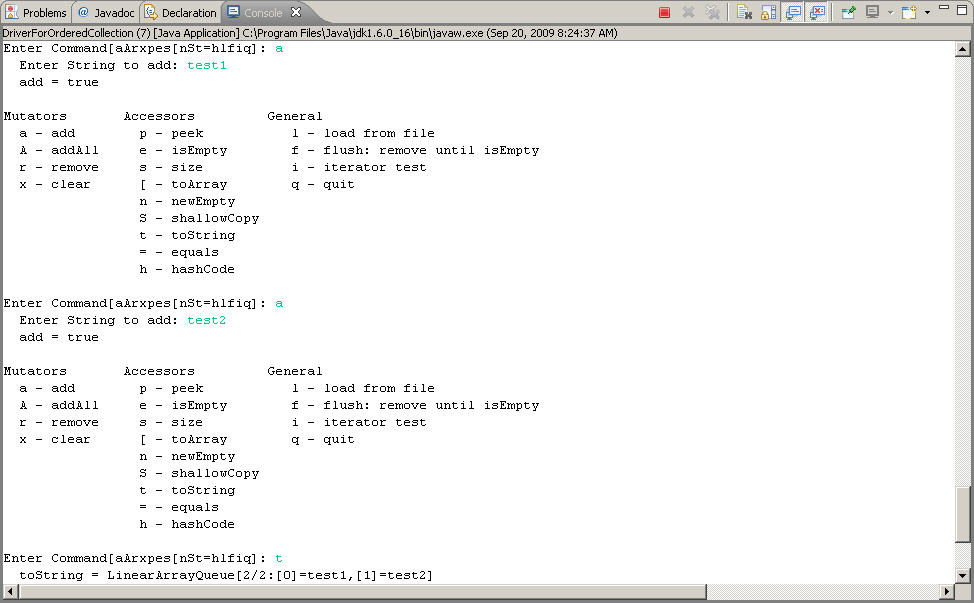
Next issue the a command and add/enqueue test1 when prompted. This method returns whether or not the entered value was added to the queue (for queues, which can contain duplicate values, it always returns true; for sets, which cannot contain duplicate values, this method returns false if the added value is already in the set). Then issue the t command and note the result: toString = LinearArrayQueue[1/1:[0]=test1] which describes a queue implemented by this class, currently storing 1 values in an array whose length is 1; the index 0 stores that value: test1. Next issue the a command again and add/enqueue test2 when prompted. Then issue the t command and note the result: toString = LinearArrayQueue[2/2:[0]=test1,[1]=test2] which describes a queue implemented by this class, currently storing 2 values in an array whose length is 2 (the length of the array storing the queue was automatically doubled in size to accommodate another value); the index 0 stores that value test1 and the index 1 stores that value test2. Order is important in queues: the earlier a value is added/enqueued, the earlier it appears in the array.
|
|
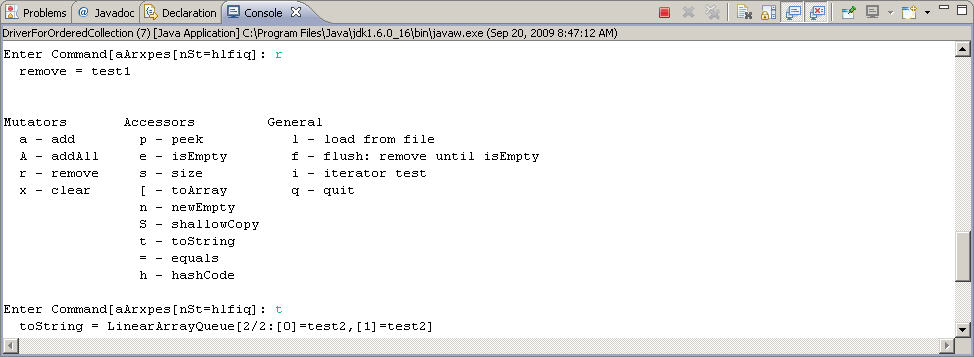
Next issue the r command which should remove/dequeue the value at the
front of the queue.
It correctly prints remove = test1.
But then issue the t command and note the result is still
toString = LinearArrayQueue[2/2:[0]=test2,[1]=test2].
|
|
This result is incorrect because test2 now appears in BOTH
array locations (it was shifted one to the left, but still appears at
the end of the array).
In fact, if you issue the r command again, it prints
remove = test2 and likewise the t command will still
print both test2 values in the queue.
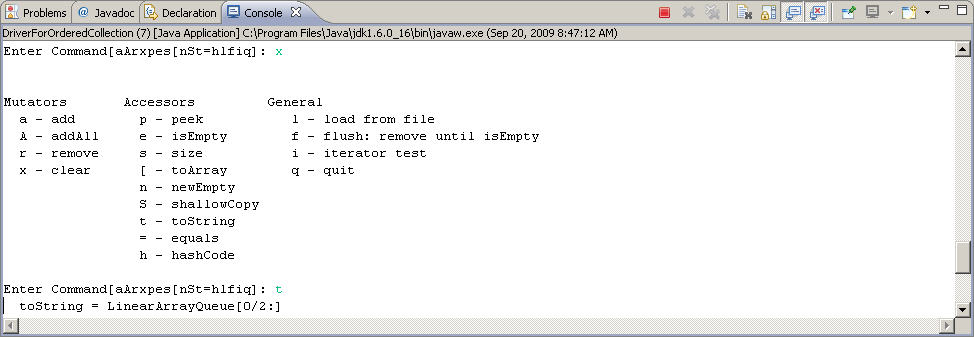
If you issue the x command (which is void and returns -and the
Driver prints- no result), the queue will be emptied; notice that
the t command will print toString = LinearArrayQueue[0/2:]
which now describes a queue implemented by this class, currently storing
0 values in an array whose length is 2 (the length of the
array is not reduced).
|
|
So, using this Driver, we can call/test all the methods in the
LinearArrayQueue class, looking for incorrect behavior.
Often we call the toString method to determine the effect of a
mutator operation, so it is critical to implement the toString method
correctly.
When we learn how to use the Debugger, we will also see how to add breakpoints to our methods and step through them while observing how they change the state of objects to help us debug any errors that we find. Using the Driver with the Debugger is illustrated in a later section of this document. For now, continue to explore the other commands in this Driver, and DO NOT fix the error in remove. If you ever find your program in an infinite loop, you can terminate the program manually by clicking the Red Square on the top of the console window (the leftmost icon). Then you can click the Xx icon (two to the right of the Red Square) to clear out the console. You can try out these commands by adding a value into the queue and then issuing the f command: it repeatedly removes values from the queue (printing each value that it removes) until the queue is empty (called "flushing" the queue). But, because of the error in the remove method, this action results in an infinite loop (because no values are correctly removed, so the queue never becomes empty). So click the Red Square and Xx to reset the code. To rerun the Driver, click the white right-pointing triangle in the green circle at the top of the main/big window (under and in between the Search and Project menus). Finally, if you want to see the code for the DriverForOrderedCollection classes, double click the icon named DriverForOrderCollection.class. Eclipse will put this code in a Read-Only editor window, because this code comes from a library you cannot change. If you want to see the code for the LinearArrayQueue classes, click the + in front of the icon named edu.uci.ics.pattis.ics23.collection (the one right under Program0 and then double-click the icon named LinearArrayQueue.java, which you can examine and change in an editor window. |
| Run the JUnit Test |
Each data type that we will discuss this quarter also has a JUnit test.
While a Driver for a class is Java code that allows us to manually test it,
a JUnit test for a class is Java code that automatically tests the class.
It produces graphical output to show clearly which tests passed and which
tests failed; and for the failed tests, it produces more detailed information
about how the test failed.
When the code is corrected, it is very easy to rerun automatically all the
tests and observe the changes (hopefully more/all test are passed now).
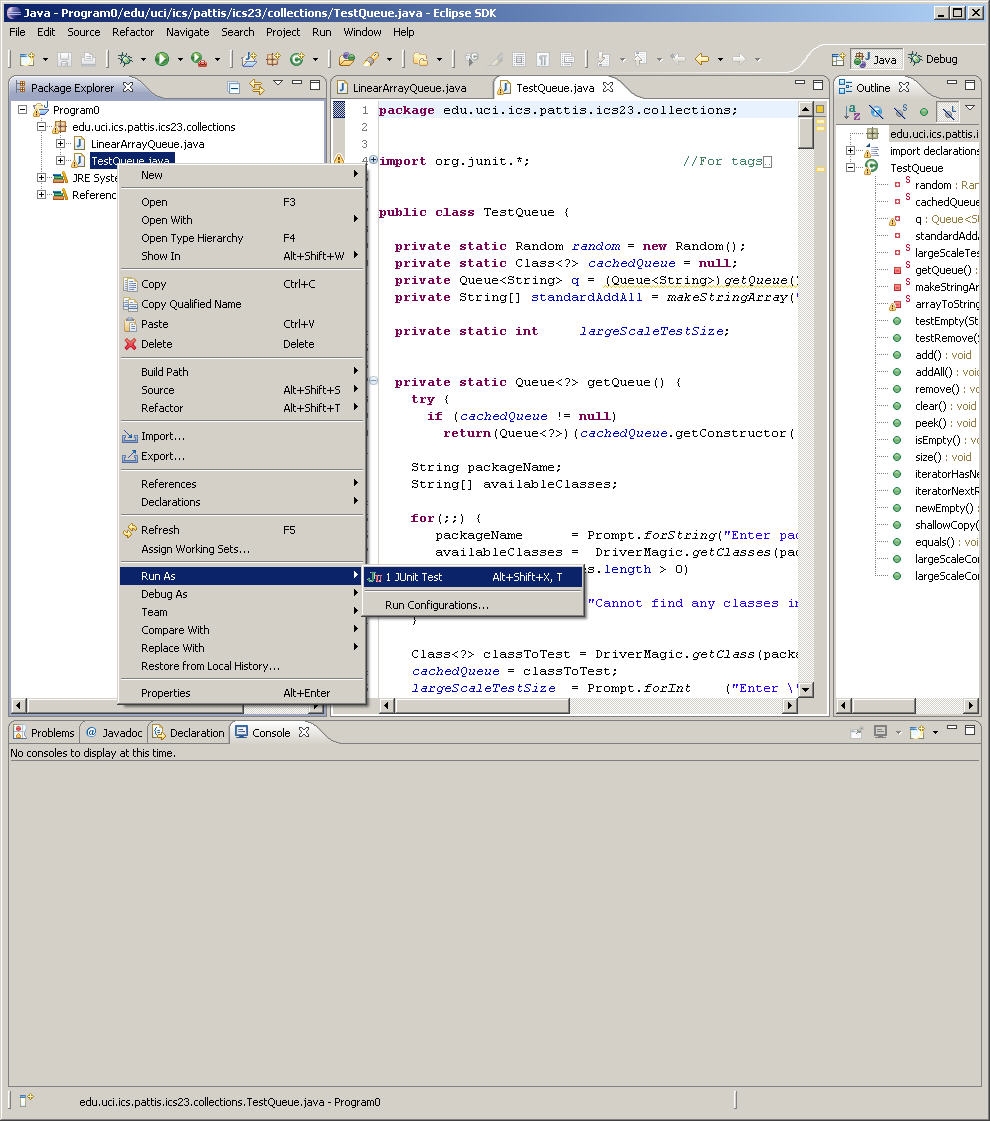
To run a JUnit test program, we must first find it: But first, click the - in front of Referenced Libraries; the - should change to a + and all the icons underneath it should be elided.
|
|
You can examine the code in this class by double-clicking the icon and/or
name TestQueue.java.
Each interface has its own JUnit test, reflecting the semantics (meaning) of
what the methods in a class implementing the interface do.
It is good to be able to read and understand this code (and you will get
more experience doing so during the quarter) because it can be useful to add
debugging code to it: typically printing the state of variables at the
time a test/assertion failed.
Mostly JUnit code intersperses calls to the methods of the class being
tested with assertions about what the results of those method-calls should
be: a test method fails when any assertions in it fail.
If you have not already done so, follow the instructions described above to start running the JUnit test in the Console tab at the bottom of Eclipse. Answer the first prompt by just pressing the Enter/Return key (it is as if you typed the default value that appears in the parentheses); then answer the second prompt by typing the number in brackets that precede LinearArrayQueue (which should be option 2); finally, answer the last prompt by also just pressing the Enter/Return key (it is as if you typed the default value that appears in the parentheses). A tab labelled JUnit will obscure the tab labelled Package Explorer in the leftmost window in Eclipse. In fact, the JUnit tab will split in half, with the bottom pane labelled Failure Trace. The large scale speed tests take some time to complete, but even so, very quickly all the tests will appear, some marked with a green check (passed) and some marked with a Blue S (failed). The green progress bar changes to red because not all tests were passed; above the progress bar it shows 14 tests run and 7 tests failed (we'll discuss the 0 test errors below: errors and failures are indicate two different problems with the code being tested). The result of running the JUnit test is illustrated below. |
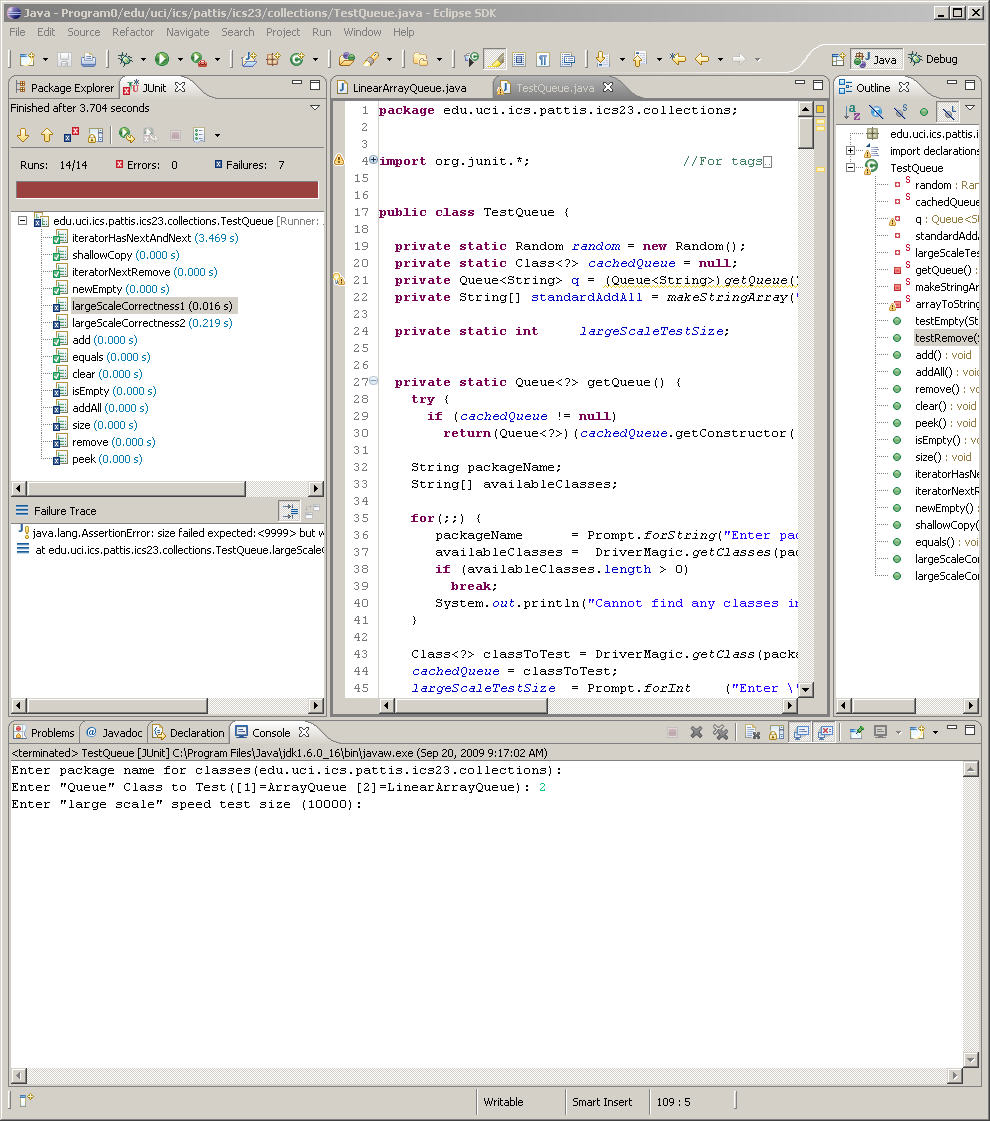
|
It is possible that incorrect code will result in an infinite loop in a JUnit
test; you will see that test as active, with the tests after it neither
marked Green nor Blue.
In such a case, you would have to manually stop the program as described above
(clicking the Red Square in the Console window).
In the graphic above, the Red Square is greyed-out, because the JUnit test has
already terminated.
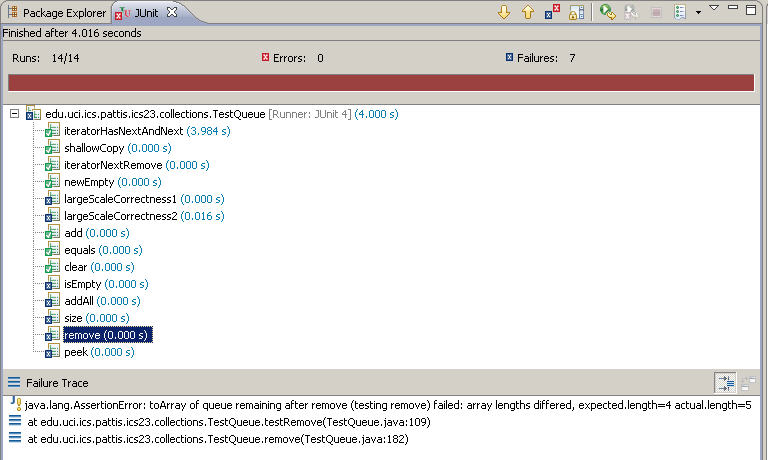
You have a choice of either commenting out the @Test annotation at the beginning of the problematic test (so JUnit won't run this test) or keeping the test and immediately debugging the code that is causing it to loop infinitely. If you choose the former, remember to reactivate the test eventually. To investigate a failed test further, we can click on any of the test names labelled with the Blue X; for now, click on remove (second from the bottom). By doing so, information appears in the bottom pane explaining the failure in more detail. To read this information, you will probably need to widen the leftmost window, containing the JUnit tab. |
|
The first line in the Failure Trace pane tells us that there was a problem
regarding the length of the arrays: the actual length of the array
representing the queue was 5 when it should have been 4
Double clicking the next line in the Failure Trace pane shows us the line
in the TestQueue program that discovered the problem: the failed
assertion is on line 109.
(there were originally 5 values in the queue, but after executing
the remove method on this line there should be 4).
This relates to the same problem discovered in the Driver: the remove
method does not actually remove the value from the queue, so instead of a
correct size of 4, it is one bigger.
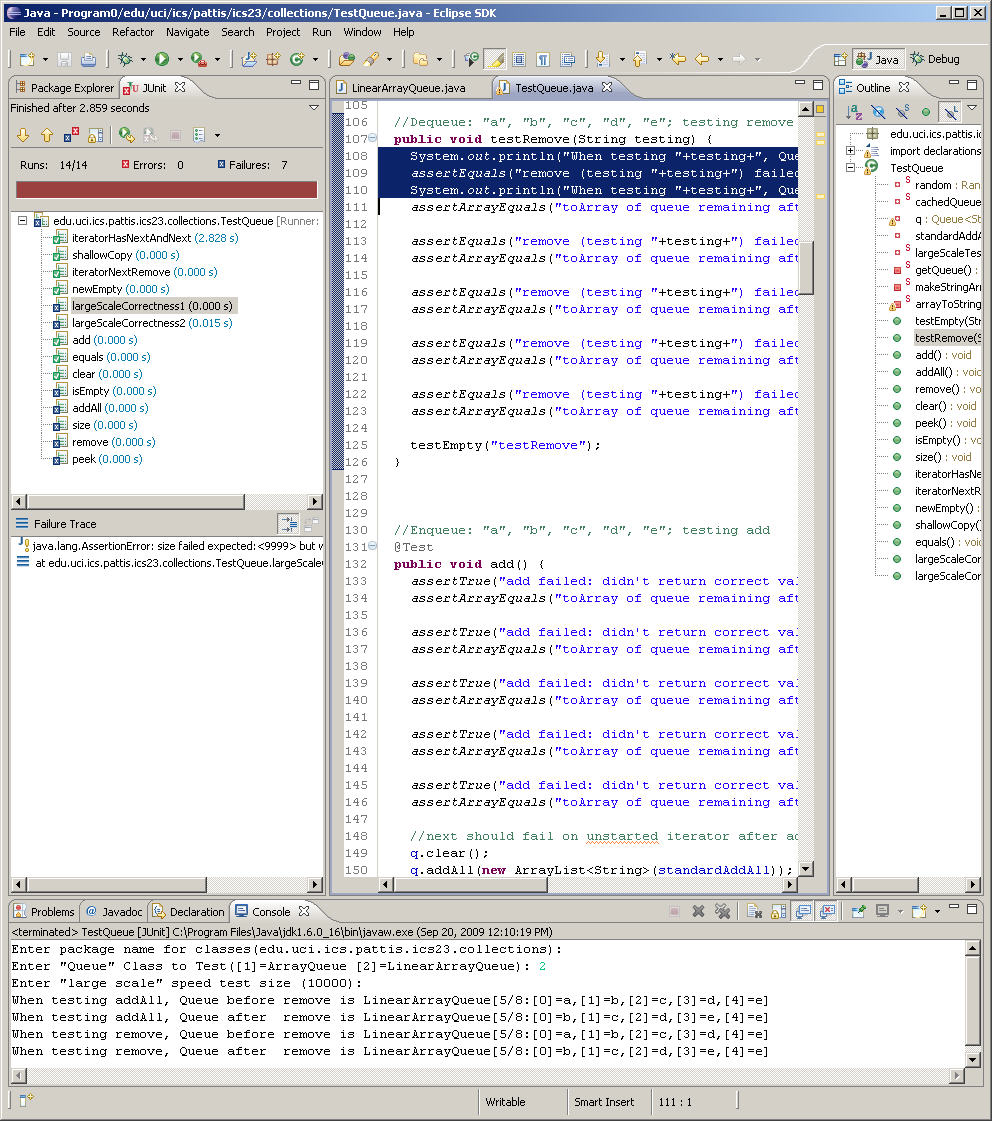
To see this problem more clearly, put the statement
|
|
By placing output statements in a JUnit test, we can more closely examine
information about the state of the queue that is failing the test.
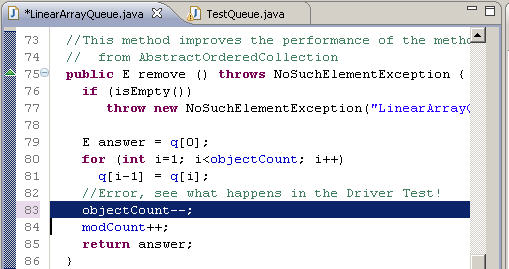
In fact, all the test failures relate to this single bug: remember that sometimes fixing one bug will cause many failed tests to pass. As stated above, this "bug" is in the remove method in the LinearArrayQueue class (see lines 82-83). Restore the code objectCount-- (uncomment it) to fix the error. |
|
Then rerun this JUnit test.
Again you will see all the tests as they execute, with the "large scale" tests taking a bit longer than the others. Because now all tests pass, instead of showing all the individual test, JUnit shows just one icon for the entire test (labelled edu.uci.ics.pattis.ics23.collections.TestQueue). We can click the + in front of its icon to disclose the individual tests. Notice also that at the top of the JUnit tab a green progress bar lengthens as each new test is performed, and spans the entire window when all tests are completed. It ultimately displays Runs 14/14, meaning it has completed all fourteen of the fourteen tests. It also displays 0 Errors and 0 Failures; in JUnit Errors are distinct from Failures.
It is possible to redo just one test. A scenario in which this option is useful is when a few tests are failing, but it takes a long time to pass other tests which JUnit runs first. In such a case, we might want to bypass the long tests and concentrate on just the one test that is failing. To do so, ensure that the icon labelled edu.uci.ics.pattis.ics23.collections.TestQueue) is disclosed and then right-click one test and select Run. JUnit will run just that one test. Again remember that if you comment-out the @Test annotation at the beginning of any test method, JUnit won't run this test. This is another way to avoid running long tests that the code is currently passing. But remember to uncomment such test methods for a final test of your code, before submitting it. |
| Debug the Code in the Driver |
In this section we will examine how to use the Eclipse Debugger along with the
Driver program to explore the code that implements the
LinearArrayQueue class.
In actual assignments, when you write classes that may contain bugs, the
skills illustrated here will be very useful for locating and correcting
errors.
First read and follow the directions in the Debugger Tutorial to learn about the Debugger. Specifically, you should learn how to set breakpoints, how to single step over (execute) lines of code, and how to observe the values of variables. Becoming familiar with the Debugger now will help you immeasurably later in the quarter; for every hour you play with the Debugger now, I estimate you will save 3 hours later in the during the quarter, by being able to use the Debugger skillfully to correct your code. After you have read the Debugger Tutorial, perform the actions below. Run the DriverForOrderedCollection program (not the JUnit test) as described above. Immediately stop this program and clear the Console (click the Red Square and Xx buttons). Then start the Debugger perspective (click Debug) and rerun this program in the Debugger (click the green bug icon). Set unconditional breakpoints on the first line of code in the add and remove methods (lines 64 and 76 respectively). Start running the program by clicking the right-pointing green arrow (after the Debug tab in the upper-left window).
On some machnines, Eclipse will display a tab
URL ClassLoader.class with the line
Click in "Breakpoints" tab in the upper-rightmost window: there, click the box that shows a check before the classNotFoundException: caught and uncaught and the check should disappear. |
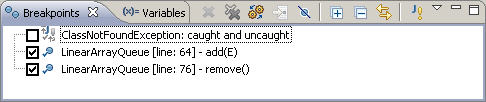
|
Then click the right-pointing green arrow (to the right of the Debug tab in the
upper-left window) again.
You will be prompted in the console window for the basic information needed to start the Driver. Issue the a command and the String test1. At that point the Debugger should stop at line 64, highlighted by a green line (this line is about to be executed). If we disclose the this variable in the Variables tab it should display the following information |
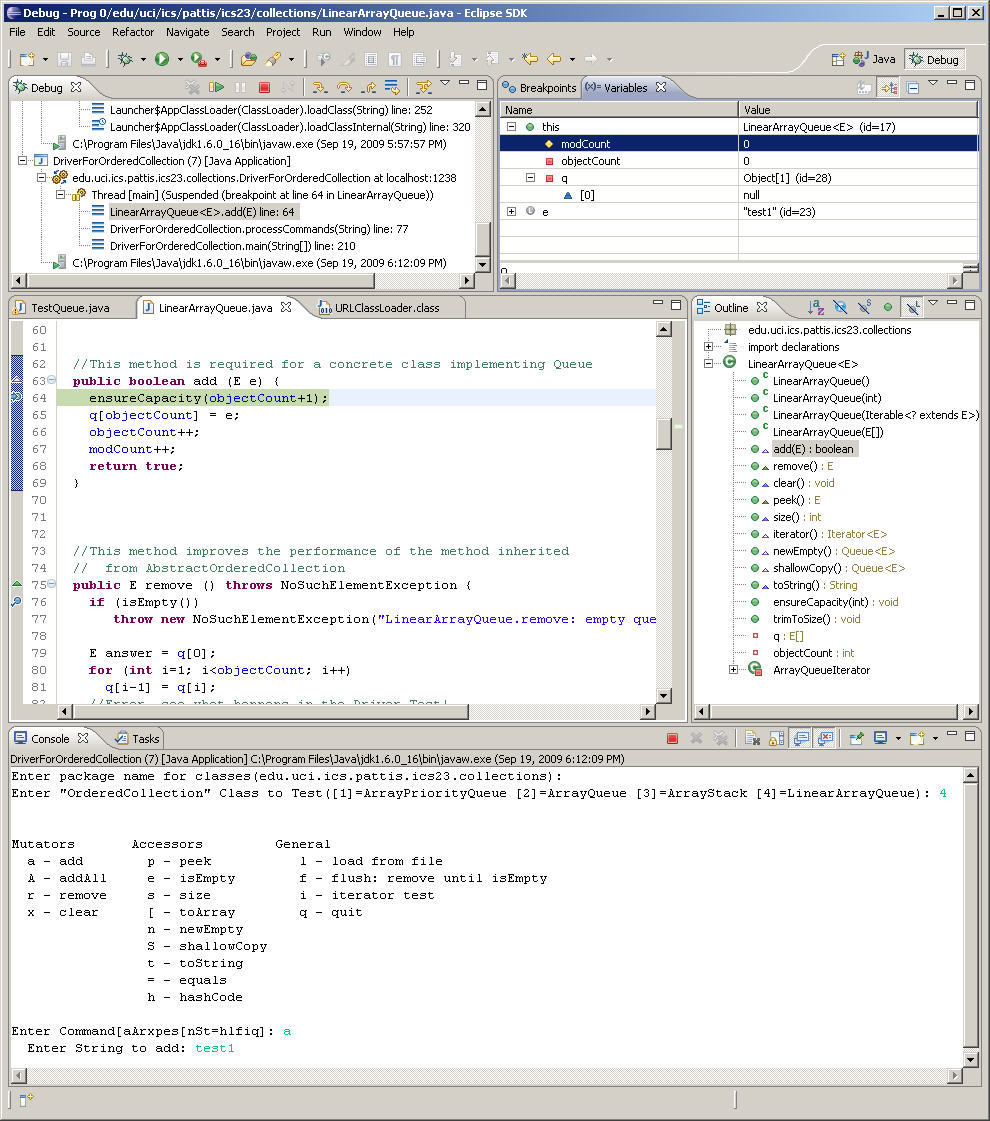
|
Notice that the modCount and objectCount instance variables
are both 0, the one element in the q array stores null
(refernce to no String).
Notice also that the parameter variable e refers to the String
"test1".
Now, step over/execute each of the statements in this method, watching how each statement changes the instance variables in the disclosed this. When the last line (return statement) is about to be executed, the Variables tab should display the following information. |
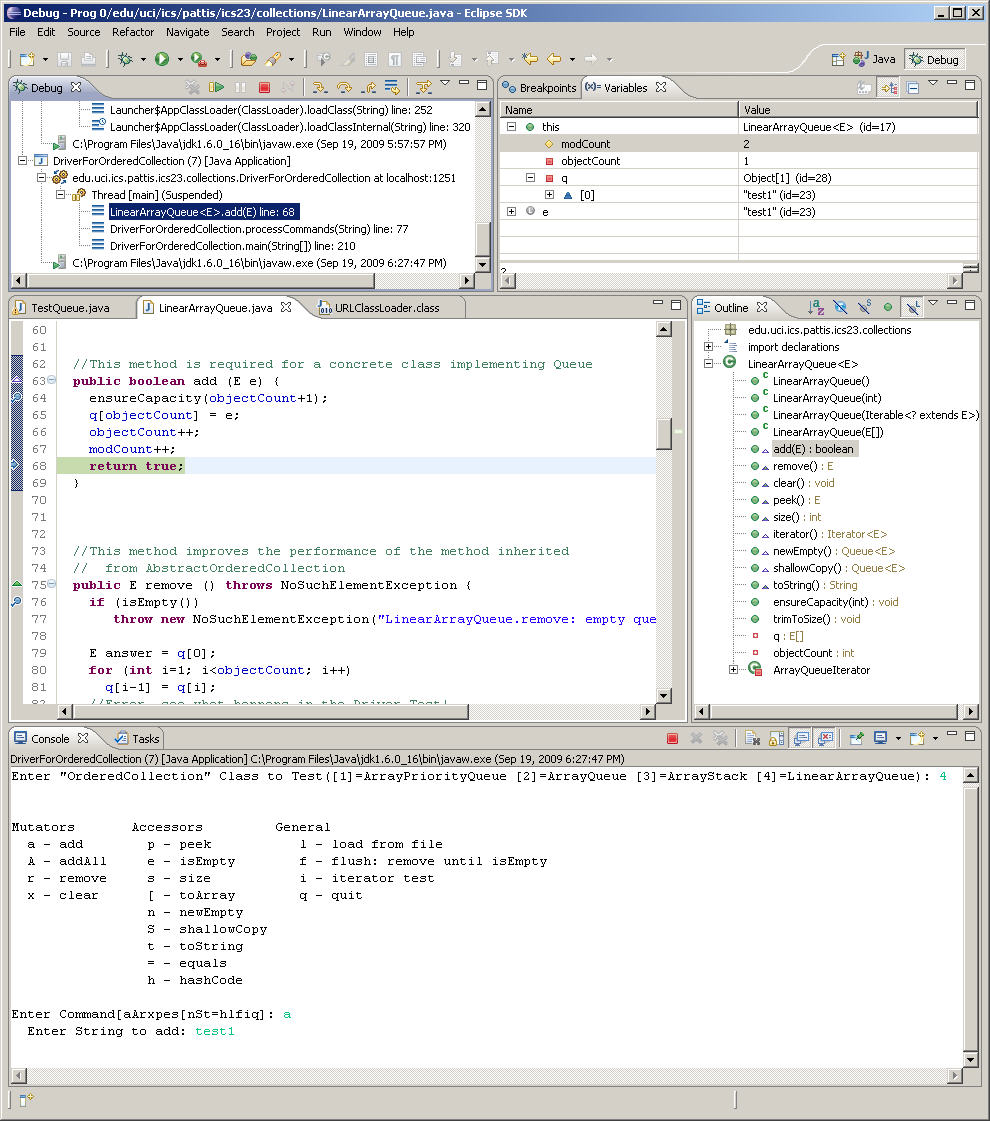
| At this point click the right-pointing green arrow again and issue the a command and the String test2. Now, step over/execute each of the statements in this method, watching how each statement changes the instance variables in the disclosed this. When the last line (return statement) is about to be executed, the the Variables tab should display the following information. |
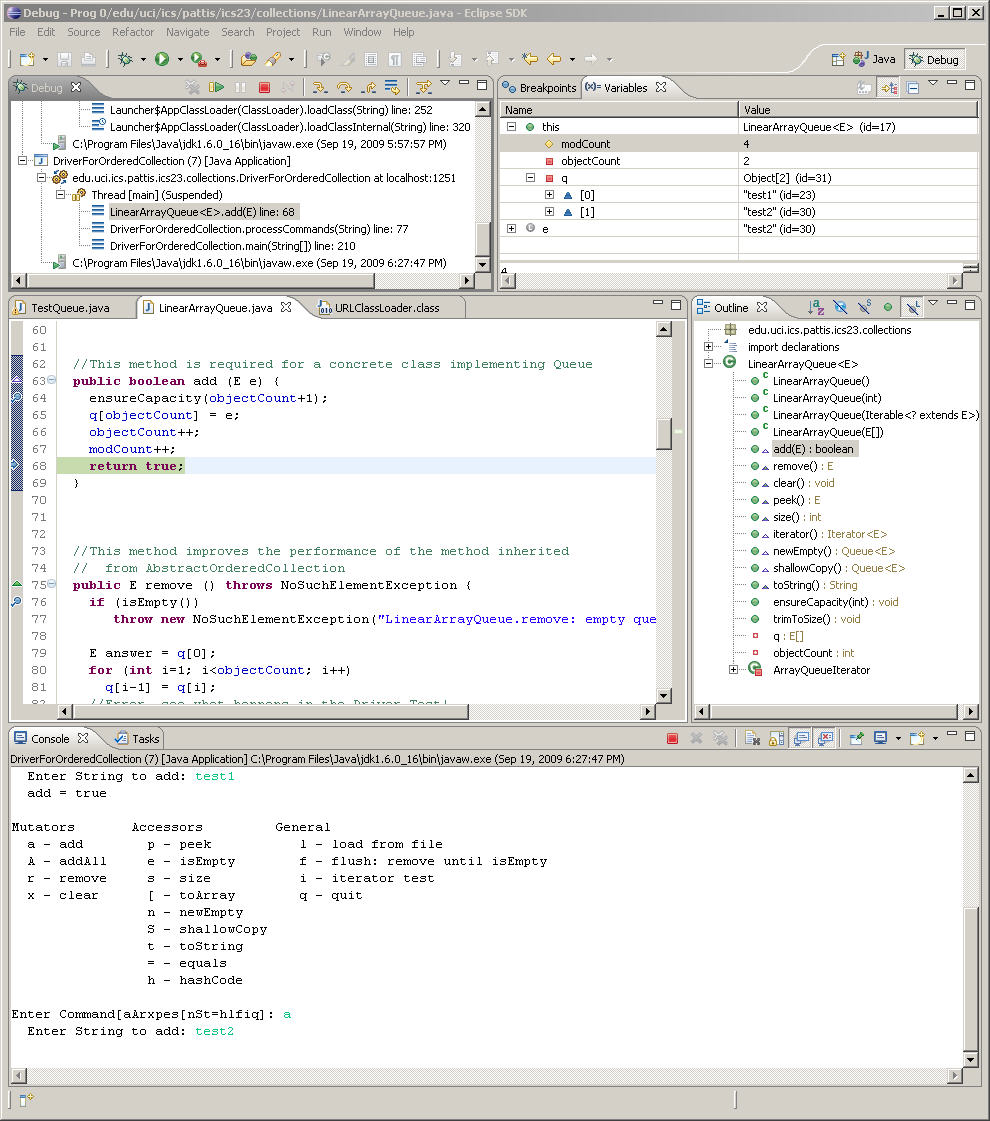
|
Note the new values for modCount, objectCount, and q
(whose length has been doubled to 2).
At this point click the right-pointing green arrow again and issue the r command. The Debugger should stop at line 76, highlighted by a green line (this line is about to be executed). The Variables tab it should display the following information |
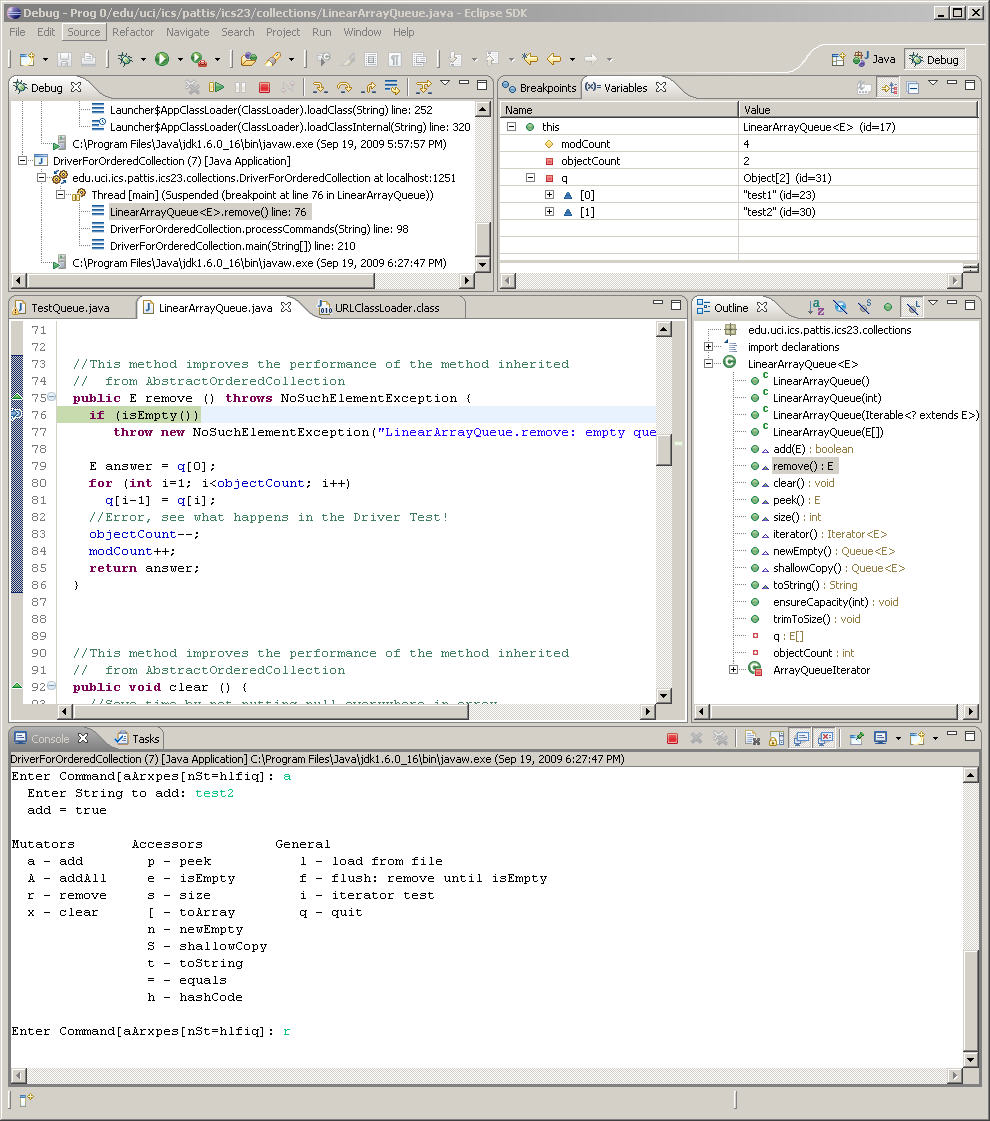
| Now, step over/execute each of the statements in this method, watching how each statement changes the instance variables in the disclosed this. When the last line (return statement) is about to be executed, the the Variables tab should display the following information. |
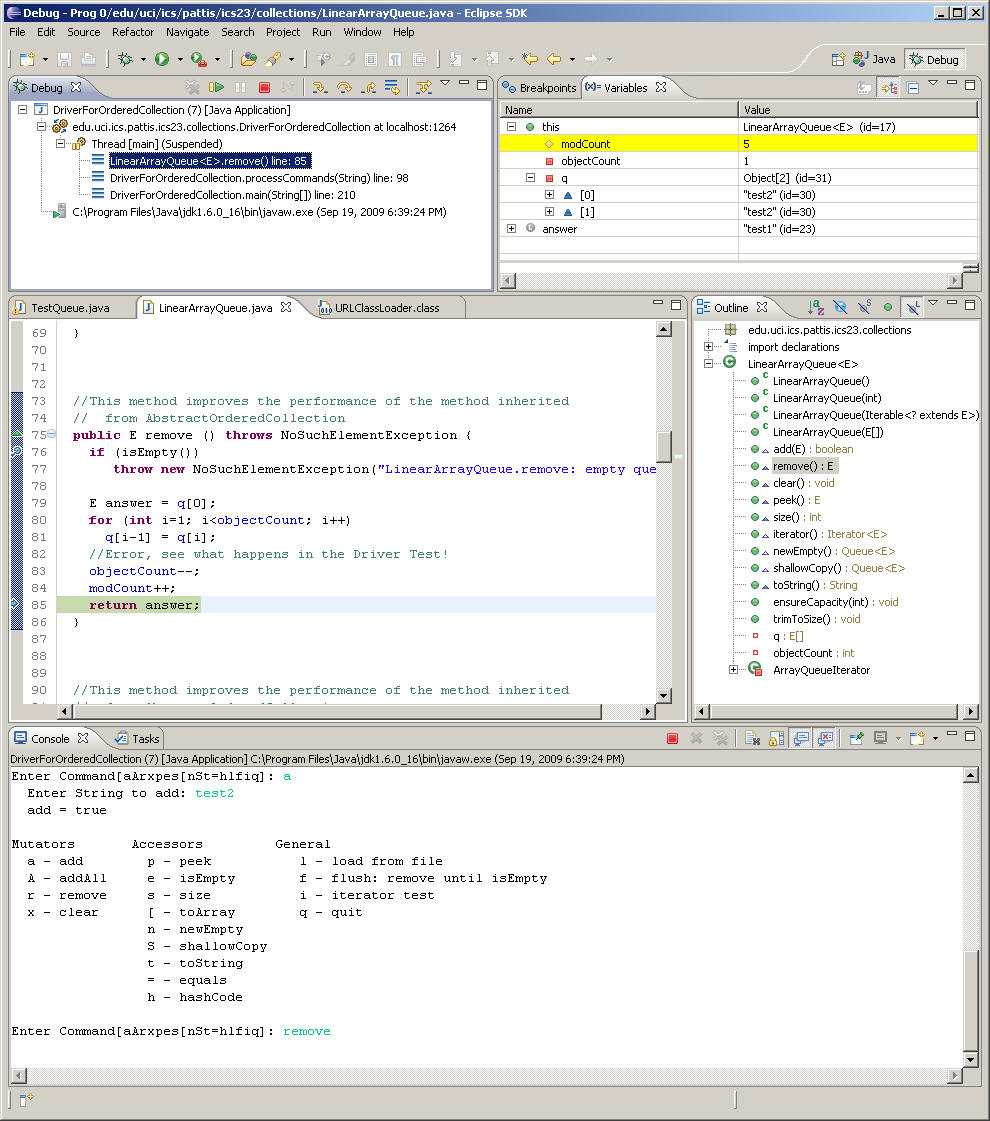
Note that the answer to be returned is test1.
Although "test2" is stored queue[0] and queue[1], the
fact that objectCount stores 1 indicates queue
currently stores only one value that will ever be examined.
We could have put the line
q[objectCount-1] = null;directly after the for loop to store null into q[1], but as in the clear method, we have chosen to omit this unnecessary code. In summary, it is important to know how to use the basics of the Debugger: to set breakpoints, to single step over/execute code, and to observe the values of variables (possible using disclosure to see "inside" an object). When we used the Debugger with the Driver program, we can carefully watch how our code works -or more importantly, watch how it fails to work to be able to debug it. |
| Submit the Program for Grading via Checkmate |
After you have fixed the code and verified that it works correctly via the
Driver and the JUnit tester, you should practice submitting the code for
grading via Checkmate.
Remember that although this assignment is not graded, you should submit it so
that I will know that you know how to submit code correctly.
Information about using Checkmate is available via the Handouts (General) link on the webpage; there, click the Windows/ Operating System and Eclipse IDE link. Or, see the Submitting Work link at the bottom of the Tutorial on the Windows Operating System and Eclipse IDE. |
| Final Words |
Finally, after you are done submitting your code you should backup/save the
entire project on a USB device (even if you are using your own computer,
you should still backup your work).
Probably it is best to zip the project folder first (which makes it smaller
and also speeds up copying -which depends as much on how many files you
copy as on the size of the files).
If you are on a lab machine, you can also backup/save this folder on your
Unix file space.
Information about using your Unix storage is available via the Handouts (General) link on the webpage; there, click the Windows/ Operating System and Eclipse IDE link. Or, see the File Storage link in the Tutorial on the Windows Operating System and Eclipse IDE. Practice doing everything in this lab over and again, until you are familiar with all these skills and can do them without reading the directions. You will save yourself much time during the quarter (when time is really important) if you spend some time now (when things aren't so rushed) mastering the material in the "programming assignment". |